Saturday, September 6, 2014
Vitamix Blender - Recipe for the Ultimate Creamy Green Smoothie!
Even though I've read a ton of reviews, and have heard so many people say positive words about a Vitamix blender, the price has always prevented me from purchasing one for myself. I too used to be one of those people who thought, "Five hundred dollars for a blender... are you out of your f*@#ing mind?!?!" I thought that never in my lifetime, could I buy enough smoothies at places like Jugo Juice or Booster Juice to equal the price of a Vitamix. But then I got to thinking, and did a little math just for fun. We probably went to Jugo/Booster Juice at least once a week, more than that in the summer months. There are four of us in the family, and if we each got one, that would be about $24 each time. $24 x 52 weeks =$1456 a year!
To be honest, I didn't seriously think about getting a Vitamix until my co-worker raved about it (in my opinion, she's in the wrong profession and should be working for Vitamix!), and gave me a little taste of the smoothie that she made. It was green, delicious, smooth and so fresh... everything a smoothie should be. I was sold!
 So I bit the bullet, and bought my own Vitamix. It came with a 64 oz BPA-free container, huge recipe book and DVD. I treated it like a precious baby when I took it out of the packaging. As you can imagine, I was in love with the blender (is it possible to fall in love with a kitchen appliance?!) and could not wait to try it out. The first time I turned the power on, I jumped a little at the sheer magnitude of power that exuded from it. It put my old Kitchen Aid blender to shame. There really is no comparison between my old and new blender. The Kitchen Aid always left little chunks of frozen fruit, and the consistency of the smoothies was never right. They were always watery, and I had to constantly chew the pulp of the greens. The Vitamix is an absolute beast of a machine. It comes with a 7 year warranty, but it will last beyond that. My husband's friend said that he's had his Vitamix for over 20 years with no problems, and it's still going strong. Now my smoothies are always creamy, smooth and chunk-free!
 I've incorporated making a green smoothie as part of my morning routine now, and that is all I eat for breakfast, along with a cup of tea. I like mine a little on the thick side, so that it fills me up and sustains me until lunch time. This is what I've been making every morning for the past few weeks. It makes enough to fill two 500 ml sized mason jars, so my husband and I grab one each before we go out the door. It contains greens, frozen mangos, dates, lemon, ginger, and bananas. The recipe is at the bottom of this post. For the greens, I usually buy Earthbound Farm Organic brand. It comes in a big tub that contains a mixture of organic baby spinach, baby kale, and red/green chard. This container makes about 4 days worth of smoothies.

This tub of organic kale, spinach and chard makes 4 days worth of smoothies for me.
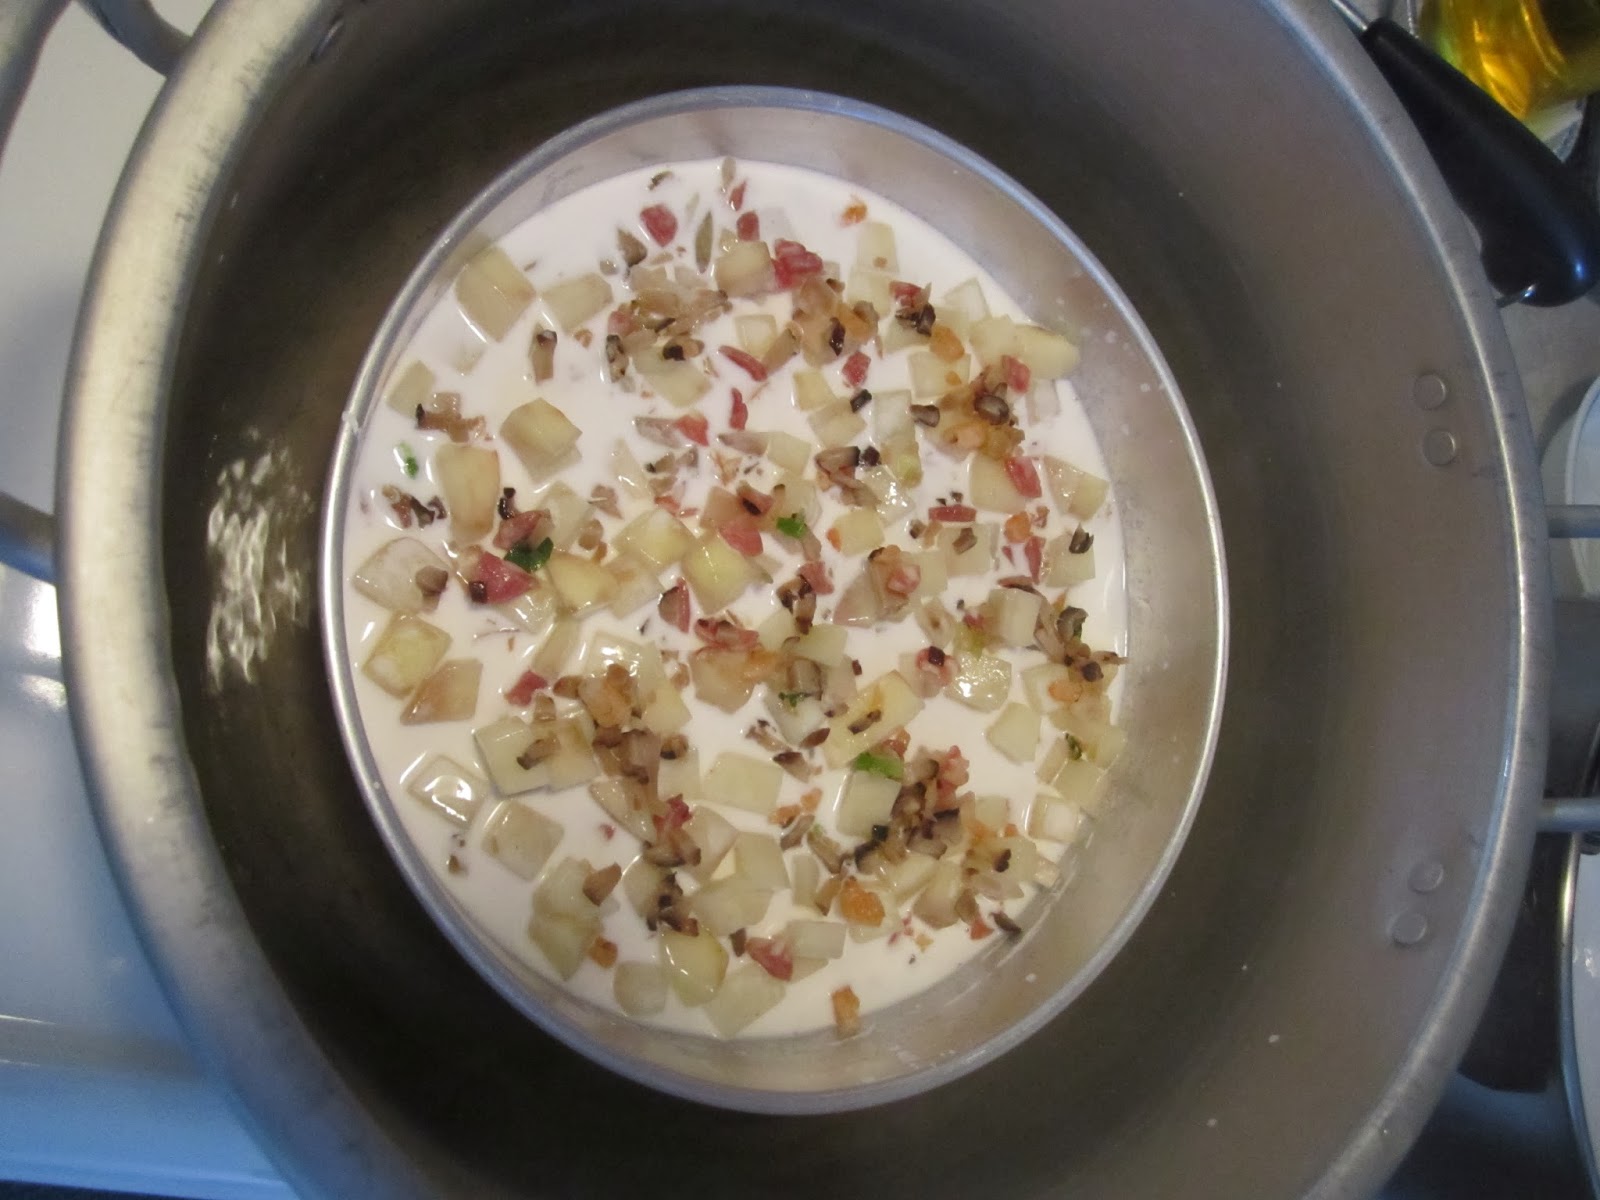
I blend the greens with water for about 20 seconds before I add the other ingredients, as I find this enables me to not have to use the big black long stick (aka the tamper), that comes with the Vitamix. The mornings are crazy enough as is with two kids, so the less things I have to wash, the better!

Blend the greens with water for about 20 seconds first.

This is the result after only 20 seconds of blending.
Next, I add the rest of the ingredients, then blend again for about a minute. I love adding frozen fruit as opposed to fresh, because it makes the smoothie nice and chilled. I buy the big bag of organic frozen mangos at Costco, and it lasts for quite a while. I leave the variable/high switch on 'variable', start at speed 1, then gradually increase to speed 10 and blend for about a minute. Even with the blender at 10, it's not as loud as my old Kitchen Aid. Don't get me wrong - it's not whisper quiet, but it's definitely not as loud as I thought it would be.

After all ingredients are added, blend for about 1 minute.
The result is a creamy, delicious, thick, refreshing, vibrant green smoothie...

Goodbye watery, pulpy, chunky smoothies; Hello creamy, smooth, yummy goodness!
The finished product...
 The Vitamix has truly changed my life. I wake up excited to make my green smoothies. I have noticed increased energy levels, improvement in my skin and nails, and a positive boost in my mood. It definitely is an investment, but if you look at it from the perspective that it will last over 20 years, it is worth the high price in the beginning. I cannot say enough good things about my Vitamix.
I am so happy to be able to provide a discount code for you when purchasing any Vitamix blender or accessory via the Vitamix.com website, or phoning their customer service line at 1-800-848-2649.
Here are the steps for getting the Free Shipping discount:
After you have added your item(s) to your shopping cart,
1) Enter the code 06-010043 in the "Promotion Code" box
2) Click "Apply", and the full shipping amount ($25 US/$35 Can.) will be deducted from your order.
Buying from Vitamix.com directly ensures that you will be getting an authentic, brand new product, backed by the full 7 year warranty. Happy Blending! ~Janice ❤

Here is the recipe for The Ultimate Creamy Green Smoothie (makes about 1 litre):
- 12 oz water
- 2-3 large handfuls of kale, spinach, chard, or a combination of any greens
- 1 cup frozen mango
- 1/2 lemon or lime, peeled
- 1 large slice of fresh ginger, peeled
- 4 pitted dates
- 1 banana
- Pour the water into the container, then add the greens.
- Start on speed 1, then gradually increase to speed 10. Blend for 20 seconds.
- Add the rest of the ingredients.
- Again, start on speed 1, then gradually increase to speed 10. Blend for about 1 minute.
- Enjoy, and feel good about all the healthy food you're putting in your body!
|
| This tub of organic kale, spinach and chard makes 4 days worth of smoothies for me. |
|
| Blend the greens with water for about 20 seconds first. |
|
| This is the result after only 20 seconds of blending. |
|
| After all ingredients are added, blend for about 1 minute. |
|
| Goodbye watery, pulpy, chunky smoothies; Hello creamy, smooth, yummy goodness! |
I am so happy to be able to provide a discount code for you when purchasing any Vitamix blender or accessory via the Vitamix.com website, or phoning their customer service line at 1-800-848-2649.
Here are the steps for getting the Free Shipping discount:
After you have added your item(s) to your shopping cart,
1) Enter the code 06-010043 in the "Promotion Code" box
2) Click "Apply", and the full shipping amount ($25 US/$35 Can.) will be deducted from your order.
Buying from Vitamix.com directly ensures that you will be getting an authentic, brand new product, backed by the full 7 year warranty. Happy Blending! ~Janice ❤
Here is the recipe for The Ultimate Creamy Green Smoothie (makes about 1 litre):
- 12 oz water
- 2-3 large handfuls of kale, spinach, chard, or a combination of any greens
- 1 cup frozen mango
- 1/2 lemon or lime, peeled
- 1 large slice of fresh ginger, peeled
- 4 pitted dates
- 1 banana
- Pour the water into the container, then add the greens.
- Start on speed 1, then gradually increase to speed 10. Blend for 20 seconds.
- Add the rest of the ingredients.
- Again, start on speed 1, then gradually increase to speed 10. Blend for about 1 minute.
- Enjoy, and feel good about all the healthy food you're putting in your body!
Pan-Fried Quinoa Cakes With Cheese
I tried Quinoa for the first time last year, and have slowly developed a liking to it with each new recipe I make. Pronounced "keen-wah", this superfood is often referred to as a grain, but is actually a seed from a vegetable that is related to swiss chard, spinach and beets. It's gluten-free, and high in protein, fibre, and calcium. I find myself making Quinoa in place of boring ol' rice a lot more these days. The one thing I suggest when making Quinoa, is to rinse it thoroughly with water in a fine-mesh colander before cooking. If you don't, the taste can be very bitter (learned that from the first few times making it... no wonder I didn't like it at first!) Sometimes I cook a huge amount, and store it in the fridge for use during the week. I enjoy it with avocados and chickpeas in a salad, or heat it up and use it as a side dish at dinner.
I just discovered a new Quinoa recipe that is so tasty, healthy and easy! Hope you give it a try, and let me know what you think! ~Janice ❤
 |
| Pan-Fried Quinoa Cakes with Cheese... and Sriracha on the side! |
Here is the recipe for Pan-Fried Quinoa Cakes with Cheese (makes about 24 cakes):
- 4 cups cooked Quinoa
- 1/2 cup shredded parmesan or cheddar cheese (I used a mix of both kinds)
- 6 tablespoons flour
- 4 green onions, chopped
- 2 eggs, beaten
- 1/2 teaspoon paprika
- 1/2 teaspoon garlic powder
- salt and pepper to taste
- olive oil for pan-frying
- Sriracha sauce (for some kick!)
- Place all ingredients except for the oil and Sriracha, in a large mixing bowl.
- Stir until thoroughly mixed.
- Heat oil in a frying pan over medium-high heat.
- Form patties that are about the size of a cookie, and 1/2 inch thick.
- Fry until golden brown on one side (about 5 minutes), then flip over and fry 5 minutes more.
- Serve with Sriracha sauce, plain yoghurt, or tzatziki sauce.
 |
| Combine cooked Quinoa with all other ingredients |
 |
| Pan-fry in olive oil over medium-high heat for 5 minutes |
 |
| Carefully flip over with a thin spatula, then fry for 5 minutes more |
Monday, January 27, 2014
Three Ingredient Banana Chocolate Chip Bites
Okay, it doesn't get any easier than this one! This recipe has become a favourite in my household of late, and I find myself making these twice a week because they disappear so fast. This has made my life so much easier when it comes to packing school lunches. I make a big batch, and quickly toss in three or four of these in their lunch bags for their snacks.
I've seen a lot of variations to this recipe, and you can definitely tailor it to however you like. The three basic ingredients are oats, bananas, and chocolate chips. I use Rogers Porridge Oats, because it has bran and flaxseed added in, but you could just as easily use Quick Oats. I photographed my daughter while she made these and she had a great time, so make sure you get the kids involved. ~Janice ❤
 |
| The 3 ingredients: Oats, Bananas, Chocolate Chips |
Step 1 - Mash the bananas in a big bowl...
 |
| Mash, mash, mash away! |
Step 2 - Add oats to the bananas. For extra fiber and health benefits, you could add in some flax, chia or hemp seeds, and bran. I had some leftover chia seeds in the fridge, so I added those in.

Step 3 - Add in chocolate chips. I used Hershey's semi-sweet, but you could make it really healthy by substituting with dark chocolate, dried cranberries, carob chips, or dried fruit. I use chocolate chips, only because my kids are more likely to eat them. Anything tastes better with chocolate chips, right?!

Step 4 - Mix together with spatula until combined...

Step 5 - Roll into one inch balls, and place on parchment-lined baking pan...

Step 6 - Bake in a preheated 350 degree oven for 15 minutes, and here is the finished product...
 |
Here is the recipe (makes about 2 dozen):
- 4 large, ripe bananas
- 2 cups uncooked quick oats
- 1/2 cup chocolate chips (I used semi-sweet)
- Add-ins (optional): bran, flax/chia/hemp seeds, dried fruit, nuts, shredded coconut
- Preheat oven to 350 degrees.
- Mash the bananas in a big bowl.
- Add oats to the bowl and mix well.
- Add chocolate chips and mix until combined.
- Roll into one inch balls, and place on parchment-lined baking pan.
- Bake for 15 minutes.
Thursday, January 16, 2014
My Mom's Potato Rice Cake Recipe (Lo Bak Go)
Happy New Year! I really have been neglecting my blog the last few months, but feel inspired to start up again, so I hope to post more regularly from now on.
Seeing that it's close to Chinese New Year (January 31st), I would like to share with you a recipe of my Mom's called Lo Bak Go (which translates to Lo Bak= Daikon Radish, Go= Cake). It is served quite frequently in Chinese restaurants during Dim Sum lunch, and is also called Turnip or Radish Cake. In this case, I am substituting the daikon radish for potatoes, hence the name Potato Rice Cake. I have been eating this dish since I was a little girl, and have always wanted to make it, so I asked my Mom if I could watch and photograph her doing it. This recipe holds a very special place in my heart, as my Mom is getting on in life, but I'll always have this forever to remember her by! I enjoy a piece of the cake dipped in a little bit of soy sauce and hot sauce. I will post the recipe at the bottom of this post. I hope you'll give it a try! ~Janice ❤
 |
| Lo Bak Go - Chinese Potato Rice Cake |
 |
| The filling: Chinese sausage, Chinese mushrooms, dried shrimp, salted turnip, green onions |

 |
| Chinese sausage (Lap Cheng) |
So on the actual day of making the Rice Cake, the steps involved are as follows:
Peel and chop the potatoes, make the rice liquid or batter for the cake, add the filling, then steam the rice cake. First, peel and chop the potatoes into 1 cm cubes. We used russet potatoes, but any kind will do.


Next, make the rice liquid or batter, using Rice Flour. We used two 400 gram bags to make five pie-plate sized Rice Cakes.

Mix the flour with some water that has been boiled and cooled, add 2 tsp. of tapioca starch, then knead with hands until it becomes dough-like.

Add enough water to the dough until it is similar to the consistency of homogenized milk. Again, make sure you use water that has been boiled and cooled, as opposed to tap water. This makes the texture of the finished cake more smooth. We needed to use about eight cups of water to get the right consistency. Stir with a ladle between each cup of water. You'll be able to tell it's ready when the back of the ladle is completely coated with the white liquid.


Ok, here comes the fun part...now it is time to steam the Potato Rice Cake! Using the ladle, fill a pie pan or deep dish with the rice liquid, until it is about 1/3 full. Sprinkle the potatoes first, then the meat filling all over the surface. Be generous with this, as this is what makes the cake taste so yummy!
Next, ladle more of the liquid on top of the filling until the plate is about 2/3 full. You should still be able to see some of, but not all of the filling.

Place the pan or dish in a steamer, and cook for about 40 minutes total. After 35 minutes of cooking time, sprinkle some chopped green onion on top to add some colour. If you don't have a steamer, you can make your own steamer by using a large wok filled with about an inch of water, place a small round rack or inverted plate in the wok, then place the pan or deep dish on top of the rack. Simmer for the same amount of time, and you will get the same result, which will look like this:
 |
| Finished! |
 |
| Pan-fried leftovers the next day! |
For the filling, which can be prepared the day before:
- 8 dried Chinese (Shiitake) mushrooms, soaked in water for 30 minutes
- 3 Chinese sausages (Lap Cheng)
- 1 cup dried shrimp, soaked in water for 30 minutes
- 2 pieces salted turnip, soaked in water for 10 minutes
- 4 green onion stalks, chopped
- Drain and squeeze out the excess water from the mushrooms, shrimp and turnip.
- Finely chop all ingredients.
- Heat 1 tbsp. of oil in a hot pan.
- Add a pinch of salt and stir fry everything together for about 5 minutes.
- Cool and set aside. Refrigerate if not making until the next day.
Rest of the ingredients:
- 4 large, or 6 medium russet potatoes, peeled
- 12 cups boiled, then cooled water
- 2 bags rice flour (red bag) *Note: do not use the Glutinous rice flour (green bag)*
- 2 tsp. tapioca starch
- 2 shallots, chopped
- Cube potatoes into 1 cm. squares.
- Heat 1 tbsp. of oil in a hot pan, and saute shallots for 2 minutes.
- Add potatoes and pan-fry for about 10 minutes. This gives the potatoes extra flavour. Set aside.
- Start on the rice flour liquid by pouring the bags of flour into a large bowl.
- Add 2-1/2 cups of the boiled water to the bowl, and mix together with your hands.
- Add tapioca starch.
- Knead with your hands until it becomes like dough.
- Add the rest of the water in, one cup at a time, stirring with a ladle between cups. It should resemble homogenized milk.
- You can tell it is ready, when you dip your ladle in the bowl, and the liquid forms a white coating on the back of the ladle.
- Using the ladle, spoon the liquid into one of the pie pans until it is 1/3 full.
- Sprinkle potatoes, then the meat filling all over the surface of the liquid.
- Ladle more of the liquid on top, filling the pan to 2/3 full. You should be able to still see some of the filling, so don't cover completely!
- Cover and steam over boiling water for about 35 minutes.
- Sprinkle some chopped green onions on top, then cover and steam for 5 minutes more.
- Carefully remove the pan from the steamer. Cool slightly, then cut the rice cake into pieces.
- Serve with soy sauce and hot sauce. I like to use Sriracha Hot Chili Sauce. Enjoy!
- Any leftovers that are stored in the fridge can be pan-fried in oil until a crispy crust is formed (see photo above). This tastes even better, and it's usually how Dim Sum restaurants serve it.
Monday, August 26, 2013
Chicken Thighs with Wide Buttered Noodles, Fennel and Grapes
I love food that is simple and flavourful with minimal ingredients. I have found the most tasty, yet elegant chicken recipe! You can easily serve this to your family as a weeknight dinner, or it would be perfect for a formal or holiday dinner as well. It is Tyler Florence's "Chicken Thighs with Wide Buttered Noodles, Fennel and Grapes", from his cookbook entitled Tyler's Ultimate.
The combination of the crispy chicken, fennel bulbs, butter and parsley is to die for. I have made this dish many times for my family and it's definitely a favourite, even with the picky eaters!
The recipe can be found here. Try making this for yourself, and let me know what you think! I'm sure you'll be adding it to your list of favourite recipes too! ~Janice ❤
 |
| My version of Tyler Florence's Chicken Thighs with Wide Buttered Noodles, Fennel and Grapes |
Sunday, August 4, 2013
Look What I Found On Top Of My Lychee!
Ever since I was a child, I have enjoyed eating lychee fruit. You peel the brown outer shell and eat the sweet juicy white fruit that is inside, discarding the pit in the center.
The other day, I bought a bag of lychees and look what I discovered! The inner child in me shrieked with delight as I saw what looked like a tiny snail on top of a lychee! It wasn't a real snail of course, but I had to do a double-take nevertheless!
Ah yes...it's the little things in life that give me the most joy! ~Janice ❤
 |
| A "snail" on top of my lychee! |
Wednesday, July 10, 2013
My Sexy Summer Salmon Avocado Zucchini Anchovy Salad!
Do you ever go to a restaurant and get annoyed when someone orders a salad, but he/she prefers the dressing on the side? Well... I'm one of those annoying people! Don't get me wrong... I used to love dressing on my salad, the more the better! But that all changed once I got married. My husband used to order his salad without any dressing, and I used to think he was nuts! I thought, how could anyone possibly have a salad with no dressing!
I would like to share with you a very simple Salmon Salad recipe with you that is insanely easy to make. I made it for dinner tonight, in fact. It was absolutely delicious, and I cannot wait to make it again!
 |
| Easy Salmon, Avocado, Anchovy, Zucchini Salad |
- 1 bag of mixed greens of your choice
- 1 fillet of salmon (my fish market had fresh salmon burgers today, so I used that instead)
- 1 avocado, cubed
- 1 can of anchovies in olive oil
- 1 zucchini, sliced
- olive oil
- salt and pepper to taste
- Pan fry the salmon in a little bit of olive oil until brown and cooked, then cut into chunks.
- Grill or pan fry the zucchini until brown and tender.
- Assemble the salad greens in a big bowl.
- Add the salmon, zucchini, avocado and anchovies.
- Drizzle with olive oil.
- Season with salt and pepper.
And that's it! I hope you enjoy this salad as much as I do. Let me know what you think, and please feel free to comment with variations or suggestions! Happy eating! ~Janice ❤
 |
| This salad is insanely easy to make! |
No comments:
Post a Comment